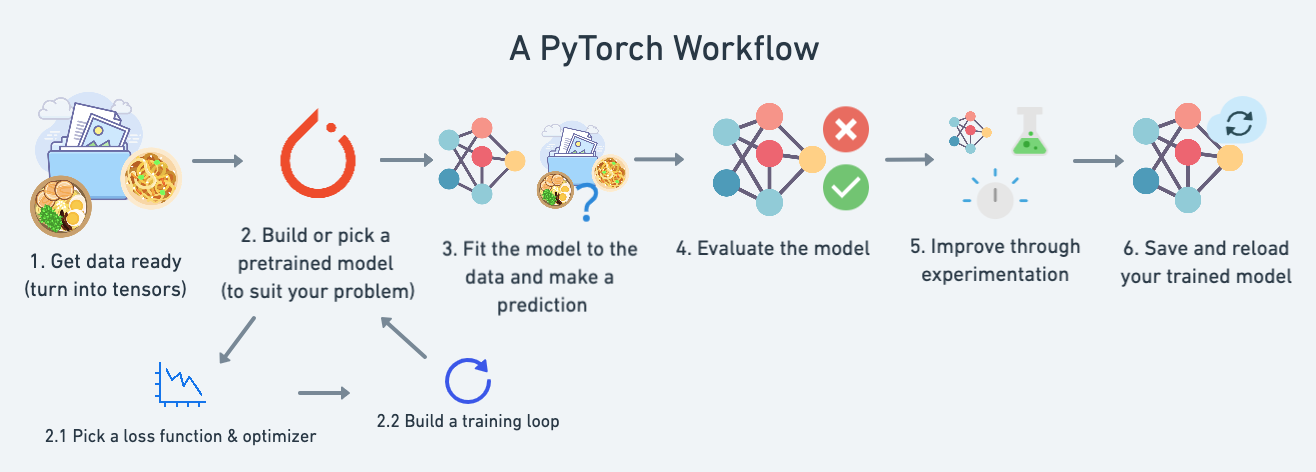
🚀 Mastering PyTorch: The Ultimate Guide to Unlocking AI & ML Superpowers! 🧠✨
🚀 Mastering PyTorch: The Ultimate Guide to Unlocking AI & ML Superpowers! 🧠✨
Are you ready to dive into the world of Artificial Intelligence (AI) and Machine Learning (ML)? If so, PyTorch is your ultimate weapon! 🛠️ Whether you’re a beginner or a seasoned pro, understanding PyTorch in detail can transform the way you build, train, and deploy AI models. In this blog, we’ll explore why PyTorch is a game-changer, its coolest features, and how it can supercharge your AI/ML projects. Let’s get started! 🎉

🤔 Why Should You Know Every Detail of PyTorch?
PyTorch is not just another library; it’s the backbone of modern AI research and development. Here’s why you should master it:
- Flexibility & Ease of Use: PyTorch’s dynamic computation graph makes it intuitive and easy to debug. You can modify your model on the fly, which is perfect for experimentation. 🧪
- Industry Adoption: Used by tech giants like Facebook, Tesla, and OpenAI, PyTorch is a must-know for anyone serious about AI. 🌍
- Research-Friendly: PyTorch is the go-to framework for cutting-edge research. If you want to implement the latest papers, PyTorch is your best friend. 📚
- Scalability: From small projects to large-scale deployments, PyTorch scales effortlessly. 🚀
- Strong Community Support: With a vibrant community and extensive documentation, you’ll never feel lost. 🤝
🌟 Cool Features of PyTorch with Examples
Let’s explore some of PyTorch’s most exciting features with practical examples:
1. Dynamic Computation Graphs 🔄
Unlike static graphs, PyTorch uses dynamic computation graphs, meaning the graph is built on-the-fly as operations are performed. This makes debugging and experimenting a breeze!
import torch

# Define tensors
x = torch.tensor(2.0, requires_grad=True)
y = torch.tensor(3.0, requires_grad=True)
# Perform operations
z = x * y + y ** 2
# Compute gradients
z.backward()
print(x.grad)  # dz/dx = y = 3.0
print(y.grad)  # dz/dy = x + 2y = 2 + 6 = 8.0
2. Autograd: Automatic Differentiation 🧮
PyTorch’s autograd module automatically computes gradients, which is essential for training neural networks. No more manual gradient calculations! 🎉
# Define a simple linear model
model = torch.nn.Linear(1, 1)

# Loss function and optimizer
criterion = torch.nn.MSELoss()
optimizer = torch.optim.SGD(model.parameters(), lr=0.01)

# Training loop
for epoch in range(100):
    inputs = torch.tensor([[1.0], [2.0], [3.0], [4.0]])
    targets = torch.tensor([[2.0], [4.0], [6.0], [8.0]])
    # Forward pass
    outputs = model(inputs)
    loss = criterion(outputs, targets)
    # Backward pass and optimization
    optimizer.zero_grad()
    loss.backward()
    optimizer.step()

print(model.weight, model.bias)
3. TorchScript for Production 🏭
PyTorch’s TorchScript allows you to serialize and optimize models for production. This bridges the gap between research and deployment.
# Convert model to TorchScript
scripted_model = torch.jit.script(model)

# Save the model
scripted_model.save("model.pt")
# Load the model
loaded_model = torch.jit.load("model.pt")
4. Pre-trained Models with TorchVision 🖼️
PyTorch’s torchvision library provides pre-trained models for computer vision tasks like image classification, object detection, and segmentation.
import torchvision.models as models

# Load a pre-trained ResNet model
resnet = models.resnet50(pretrained=True)
# Use the model for inference
resnet.eval()
5. Distributed Training 🌐
PyTorch makes it easy to scale training across multiple GPUs or machines with its torch.distributed module.
import torch.distributed as dist

# Initialize the process group
dist.init_process_group(backend='nccl')
# Use DistributedDataParallel for multi-GPU training
model = torch.nn.parallel.DistributedDataParallel(model)
6. ONNX Support for Interoperability 🔄
PyTorch supports ONNX (Open Neural Network Exchange), allowing you to export models to other frameworks like TensorFlow or Caffe2.
# Export model to ONNX format
dummy_input = torch.randn(1, 3, 224, 224)
torch.onnx.export(model, dummy_input, "model.onnx")
🚀 AI & ML Benefits of Using PyTorch
- Faster Prototyping: With its Pythonic syntax and dynamic nature, PyTorch lets you iterate quickly. �
- State-of-the-Art Models: PyTorch is the framework behind many breakthroughs in AI, like GPT and BERT. 🏆
- Seamless Integration: PyTorch integrates well with popular libraries like NumPy, SciPy, and Pandas. 🔗
- Customizability: You can build custom layers, loss functions, and optimizers with ease. 🛠️
- Community & Ecosystem: PyTorch has a rich ecosystem of tools like Hugging Face, FastAI, and PyTorch Lightning. 🌱
🎯 Real-World Applications of PyTorch
- Natural Language Processing (NLP): Build chatbots, translators, and sentiment analysis models. 💬
- Computer Vision: Create image classifiers, object detectors, and GANs. 📸
- Reinforcement Learning: Train agents to play games or control robots. 🎮
- Healthcare: Develop models for disease detection and drug discovery. 🏥
🛠️ Getting Started with PyTorch
1. Install PyTorch:
pip install torch torchvision2. Explore Tutorials: Check out the official PyTorch tutorials. 📖
3. Join the Community: Engage with the PyTorch community on forums and GitHub. 🌐
🎯 Conclusion
PyTorch is more than just a library; it’s a powerhouse for AI and ML innovation. By mastering its features, you can unlock endless possibilities in AI research and application development. Whether you’re building the next GPT or a simple image classifier, PyTorch has got your back. So, what are you waiting for? Dive into PyTorch today and start creating the future! 🌟
Got questions or thoughts? Drop them in the comments below! Let’s build something amazing together. 🚀
Comments
Post a Comment