🚀 Mastering State Management in ReactJS: From Zero to Pro! 🧠⚛️
🚀 Mastering State Management in ReactJS: From Zero to Pro! 🧠⚛️
Managing state in React can feel like juggling flaming swords if you’re not equipped with the right tools! 🔥 But fear not — this guide will walk you through every popular way to manage state in React, from basic hooks to powerful libraries. Let’s turn that messy app into a smooth, state-driven machine. 💻🎯
🔍 What is State Management?

In React, state refers to the data that controls the behavior of a component. State Management is the process of handling, updating, and sharing this data across your application. 🧩
🧩 1. useState Hook (Local State)
Ideal for: Small, local component-level state
✨ Features:
- Simple and quick
- Best for toggles, form inputs, modals, etc.
🛠️ How to Use:
import React, { useState } from 'react';

function Counter() {
  const [count, setCount] = useState(0);
  return (
    <>
      <h2>Count: {count}</h2>
      <button onClick={() => setCount(count + 1)}>➕ Increment</button>
    </>
  );
}
✅ Best for: Isolated component logic
🚫 Avoid when: You need to share state between many components
🌐 2. useContext + useState (Global-ish State)
Ideal for: Sharing state across components without prop drilling
✨ Features:
- Lightweight alternative to Redux
- Works well for theme, language, or user info
🛠️ Step-by-Step:
1. Create Context:
import { createContext } from 'react';
export const ThemeContext = createContext();
2. Provide Context:
<ThemeContext.Provider value={{ theme, setTheme }}>
  <App />
</ThemeContext.Provider>
3. Consume Context:
const { theme } = useContext(ThemeContext);✅ Best for: App-wide data like dark mode, auth
🚫 Avoid when: App grows too complex — performance can suffer
🧠 3. useReducer Hook
Ideal for: Complex local state with multiple sub-values or actions
✨ Features:
- Mimics Redux logic (action, reducer, state)
- Great for managing state transitions
🛠️ How to Use:
const initialState = { count: 0 };

function reducer(state, action) {
  switch (action.type) {
    case 'increment':
      return { count: state.count + 1 };
    default:
      return state;
  }
}

const [state, dispatch] = useReducer(reducer, initialState);
<button onClick={() => dispatch({ type: 'increment' })}>➕</button>
✅ Best for: Counters, form state, toggles
🚫 Avoid when: You don’t need complex logic
🗂️ 4. Redux / Redux Toolkit
Ideal for: Large-scale applications with complex shared state
✨ Features:
- Predictable state container
- Middleware (e.g., Redux Thunk) for async logic
- DevTools integration
🛠️ Step-by-Step:
1. Install Redux Toolkit:
npm install @reduxjs/toolkit react-redux2. Create a slice:
import { createSlice } from '@reduxjs/toolkit';

const counterSlice = createSlice({
  name: 'counter',
  initialState: { value: 0 },
  reducers: {
    increment: state => { state.value += 1 }
  }
});

export const { increment } = counterSlice.actions;
export default counterSlice.reducer;
3. Configure Store:
import { configureStore } from '@reduxjs/toolkit';
import counterReducer from './counterSlice';

export const store = configureStore({
  reducer: { counter: counterReducer }
});
4. Use in Component:
const value = useSelector(state => state.counter.value);
const dispatch = useDispatch();

<button onClick={() => dispatch(increment())}>Increment</button>
✅ Best for: Enterprise apps
🚫 Avoid when: Small apps — you’ll over-engineer
⚡ 5. Zustand
Ideal for: Simpler global state management with minimal setup
✨ Features:
- Less boilerplate than Redux
- Built-in persistence and devtools
🛠️ How to Use:
npm install zustandimport create from 'zustand';
const useStore = create(set => ({
count: 0,
increment: () => set(state => ({ count: state.count + 1 }))
}));const { count, increment } = useStore();✅ Best for: Lightweight apps needing global state
🚫 Avoid when: You want strict typing or structure
📡 6. Jotai / Recoil (Atomic State Libraries)
Ideal for: Fine-grained control over deeply nested state
✨ Features:
- Breaks global state into smaller atoms
- Re-renders only where necessary
🛠️ Using Jotai Example:
npm install jotaiimport { atom, useAtom } from 'jotai';
const countAtom = atom(0);const [count, setCount] = useAtom(countAtom);✅ Best for: Reactive apps, performance-critical dashboards
🚫 Avoid when: You’re just learning React
🧙 Bonus: Server State Tools (React Query, SWR)
Ideal for: Managing server-side state, like fetching APIs
✨ Features:
- Automatic caching
- Background refetching
- Pagination support
🛠️ React Query Example:
npm install @tanstack/react-queryimport { useQuery } from '@tanstack/react-query';
const { data, isLoading } = useQuery(['todos'], fetchTodos);✅ Best for: Real-time APIs, remote data
🚫 Avoid when: You don’t need caching or async data
🎯 Final Comparison Table
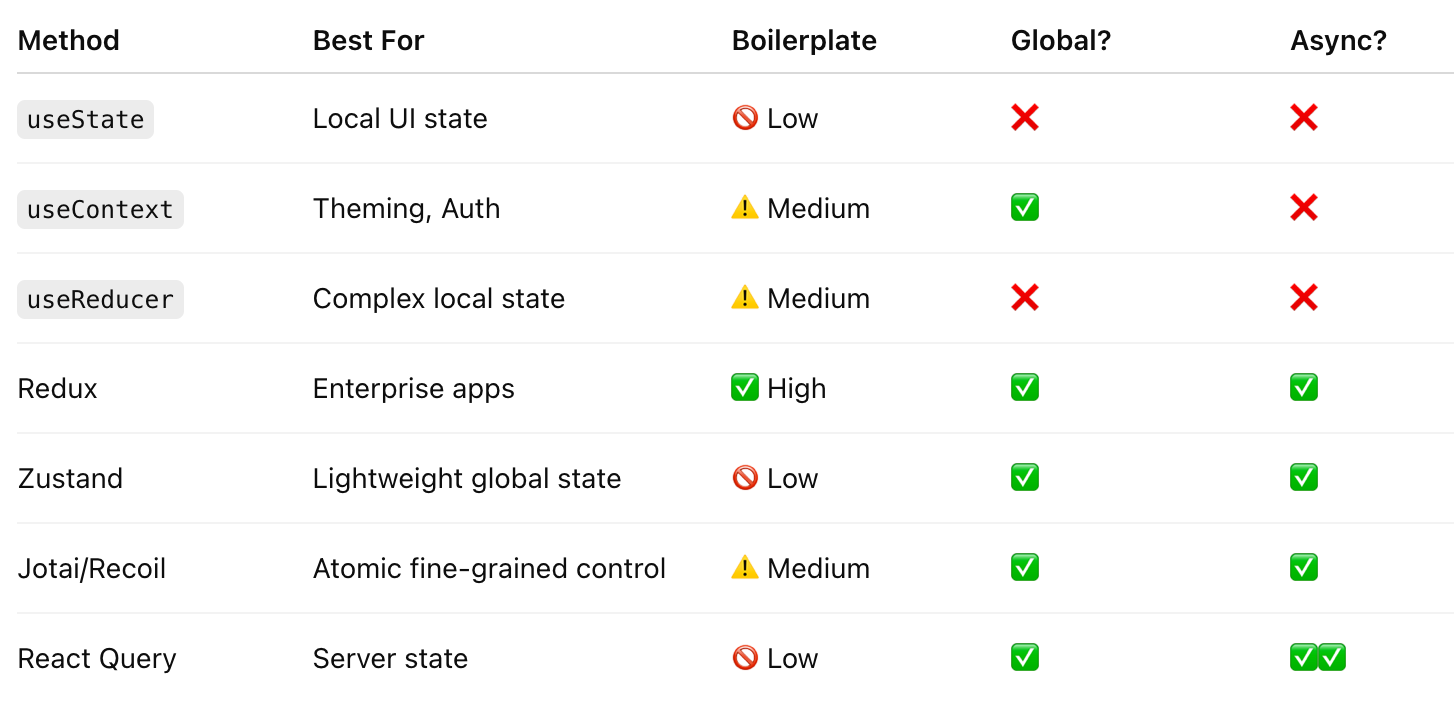
🏁 Conclusion: Which One Should You Choose?
🧠 Beginners? Start with useState and useContext.
🏗️ Building something big? Try Redux Toolkit or Zustand.
📡 Fetching APIs? React Query is your best buddy.
💡 Want performance + minimalism? Jotai or Zustand!
💬 Tell Me in the Comments:
Which state management library is your favorite and why? Share your tips or struggles below! 👇👇👇


Comments
Post a Comment