🚀 From Idea to Millions of Users: A Complete Guide to Developing Your First Application & Making It Live 🌎📱
🚀 From Idea to Millions of Users: A Complete Guide to Developing Your First Application & Making It Live 🌎📱
“Great applications are not built by writing thousands of lines of code. They are built by solving real problems with discipline, creativity, and continuous improvement.” ✨
Building your first application is one of the most exciting journeys for any developer, entrepreneur, or creator. But many beginners make the mistake of jumping directly into coding without understanding the complete lifecycle.
A successful application requires much more than programming:
✅ Finding the right problem
✅ Planning the solution
✅ Designing user experience
✅ Choosing technology
✅ Writing scalable code
✅ Testing properly
✅ Deploying infrastructure
✅ Publishing on App Store & Play Store
✅ Marketing and improving continuously
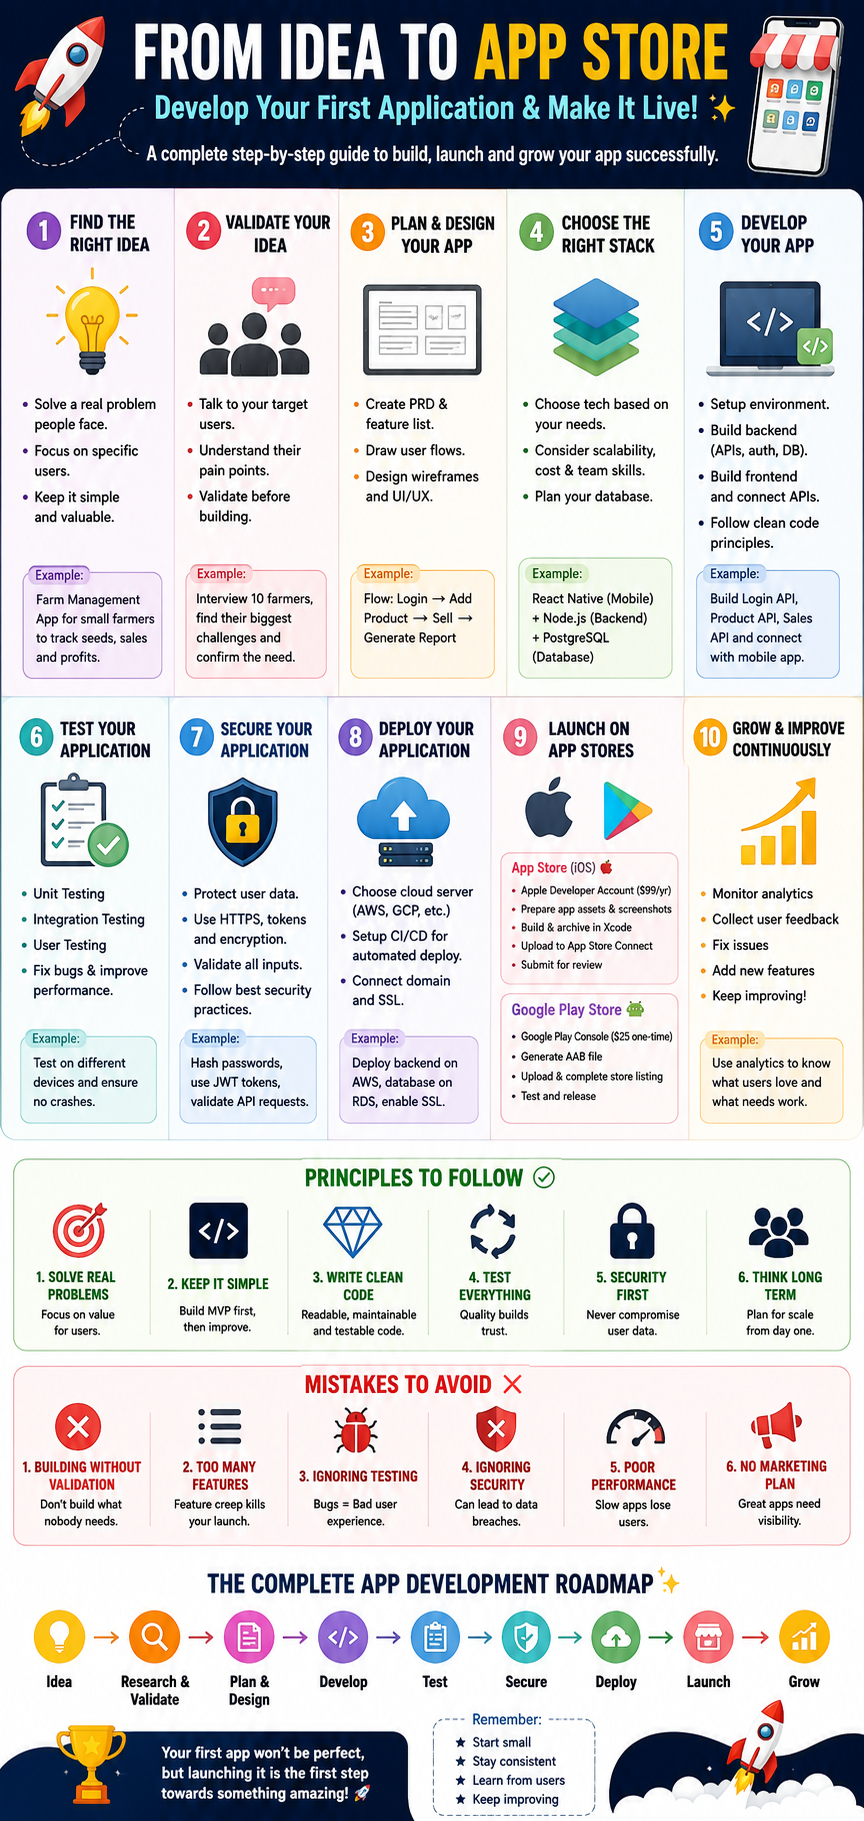
This guide will take you from idea → development → deployment → app store launch → growth.
🧠 Phase 1: Find the Right Application Idea 💡
Before writing code, ask:
“What problem am I solving?”
A great application starts with a painful problem.
Examples:
❌ Weak Idea
“I want to build a food delivery app.”
Why?
Because thousands of companies already solve this problem.
✅ Better Idea
“I want to build a food delivery app specifically for farmers where local restaurants can buy fresh organic produce directly.”
Now you have:
- Specific users
- Specific problem
- Specific market
🔍 Step 1: Validate Your Idea
Many developers spend 6 months building something nobody wants.
Before development:
Talk to Users
Ask:
- What problem do you face?
- How do you solve it currently?
- What frustrates you?
- Would you pay for a solution?
Example:
Building a farm management application:
Instead of assuming:
“Farmers need inventory management.”
Ask:
“How do you currently track seed stock, sales, and expenses?”
You may discover:
- They use notebooks
- They forget payments
- They lose customer history
Now you understand the real problem.
📊 Create a Simple Validation Document
Define:
1. Target Users
Example:
Primary Users:
- Small farmers
- Seed distributors

Age:
30-60 years

Problem:
Manual record keeping
2. Core Problem
Example:
Farmers lose money because they cannot track:
- Purchases
- Sales
- Expenses
- Profit
3. Solution
Example:
A mobile application that provides:
✓ Inventory tracking
✓ Customer management
✓ Sales reports
✓ Profit calculation
⚠️ Mistakes to Avoid
❌ Building without talking to users
❌ Copying existing apps blindly
❌ Adding too many features initially
❌ Solving a problem that doesn’t exist
📝 Phase 2: Define Application Requirements
Now convert your idea into a blueprint.
This is called:
Product Requirement Document (PRD)
A PRD explains:
- What the app does
- Who uses it
- Features required
- Technical requirements
Example PRD
Application:
Farm Management App 🌱
Users:
Admin
Can:
- Add products
- Manage workers
- View reports
Farmer
Can:
- Record sales
- Track expenses
- View profit
Feature Planning
Divide features into:
MVP (Minimum Viable Product)
The smallest useful version.
Example:
Version 1:
✅ Login
✅ Add products
✅ Record sales
✅ Generate reports
Later:
Version 2:
✅ AI recommendations
✅ Weather prediction
✅ Online payments
🚫 Avoid Feature Creep
Feature creep means continuously adding features.
Example:
Starting:
“I want a simple expense tracker.”
After 2 weeks:
- Chat system
- Social media
- Video calls
- AI assistant
- Marketplace
Result:
Application never launches.
🎨 Phase 3: Application Design (UI/UX)
A successful app is not only functional.
It must be:
- Easy
- Fast
- Beautiful
- Intuitive
Design Process
1. User Flow
Example:
User wants to sell seeds.
Flow:
Open App
 ↓
Login
 ↓
Select Product
 ↓
Enter Quantity
 ↓
Generate Bill
 ↓
Save Transaction
2. Wireframes
Create rough screens:
Example:
Dashboard
----------------
Sales Today
₹50,000
Products
Seeds
Fertilizers
Tools
----------------
Tools:
- Figma
- Adobe XD
- Sketch
3. Design Principles
🟢 Keep It Simple
Users should not think:
“Where should I click?”
🟢 Consistency
Same:
- Colors
- Buttons
- Fonts
- Navigation
🟢 Feedback
Every action should respond.
Example:
After saving:
✅ “Transaction saved successfully”
Not:
Nothing happens.
Common UI Mistakes
❌ Too many buttons
❌ Complex navigation
❌ Small text
❌ Ignoring accessibility
❌ Designing only for yourself
⚙️ Phase 4: Choose Technology Stack
Your technology depends on:
- Application type
- Budget
- Scalability
- Team skills
Mobile Application Options
Native Development
iOS
Language:
- Swift
Framework:
- SwiftUI
- UIKit
Android
Language:
- Kotlin
Framework:
- Jetpack Compose
Cross Platform
One codebase:
React Native
Uses:
JavaScript/TypeScript
Good for:
- Startups
- Faster development
Flutter
Uses:
Dart
Good for:
- Beautiful UI
Backend Development
Backend handles:
- Business logic
- Database
- Authentication
- APIs
Popular choices:
Ruby on Rails
Great for:
- Startups
- Rapid development
- SaaS products
Node.js
Great for:
- Real-time applications
Django
Great for:
- Python ecosystem
Database Selection
SQL Databases
Examples:
- PostgreSQL
- MySQL
Best for:
- Financial data
- Transactions
- Relationships
Example:
Users
id
name
email

Orders
id
user_id
amount
NoSQL
Examples:
- MongoDB
- Firebase
Good for:
- Flexible data
- Real-time apps
🏗️ Phase 5: Development Process
Now coding begins.
Step 1: Setup Development Environment
Install:
- Code editor
- Programming language
- Framework
- Database
- Version control
Example:
Application
|
├── Frontend
|
├── Backend
|
├── Database
|
└── Infrastructure
Step 2: Build Backend
Backend responsibilities:
Authentication
Example:
User login:
Email
Password
↓
Validate
↓
Generate Token
↓
Access Dashboard
API Development
Example:
Get Products:
GET /api/productsResponse:
[
 {
  "name":"Wheat Seed",
  "price":500
 }
]
Step 3: Build Frontend
Frontend handles:
- Screens
- Buttons
- User interaction
Example:
React component:
ProductCard

Name
Price
Buy Button
Step 4: Connect Frontend + Backend
Flow:
Mobile App
↓
API Request
↓
Backend
↓
Database
↓
Response
↓
Display Data
Coding Principles to Follow 🧑💻
1. Write Clean Code
Bad:
x=10;Good:
const maximumUsers = 10;Code should explain itself.
2. Follow DRY Principle
DRY:
Don’t Repeat Yourself
Bad:
Calculate tax function
in 5 files
Good:
Reusable TaxService3. Use Version Control
Always use:
Git
Example:
git add .

git commit -m "Add authentication"
git push
4. Write Documentation
Future you is another developer.
Document:
- Setup process
- APIs
- Database design
🧪 Phase 6: Testing Your Application
Never launch without testing.
Types of Testing
Unit Testing
Tests small components.
Example:
Calculate Total Price()Integration Testing
Tests systems together.
Example:
Login + Database + API
User Testing
Real users test:
- Usability
- Bugs
- Confusion
Testing Checklist
Before launch:
✅ App doesn’t crash
✅ Login works
✅ Payments work
✅ Data is secure
✅ Works on different devices
✅ Handles errors
🔐 Phase 7: Security Before Launch
Security is not optional
Important Security Practices
Protect User Data
Never store:
password123Store:
hashed_passwordAPI Security
Use:
- Authentication tokens
- Rate limiting
- HTTPS
Validate Input
Never trust users.
Example:
User enters:
<script>alert()</script>Your system should block it.
🚀 Phase 8: Deploying Your Application
Your app needs servers.
Backend Deployment
Popular platforms:
- AWS
- Google Cloud
- Azure
- DigitalOcean
Deployment flow:
Code
↓
Server
↓
Database
↓
Domain
↓
Users
CI/CD Pipeline
Automate deployment.
Example:
Developer pushes code:
GitHub
↓
CI/CD
↓
Run Tests
↓
Deploy
↓
Production
📱 Phase 9: Launching on Apple App Store 🍎
To publish an iOS application:
You need:
1. Apple Developer Account
Register at:
Cost:
$99/year
2. Prepare Application
Required:
App Information
- App name
- Description
- Keywords
- Category
App Assets
Prepare:
- App icon
- Screenshots
- Preview videos
Privacy Information
Apple requires:
- Data collection details
- Privacy policy
- Tracking information
3. Build iOS Release Version
Using:
Xcode
Steps:
Open Project
↓
Configure Bundle Identifier
↓
Set Version
↓
Archive Build
↓
Upload
4. Submit Through App Store Connect
Use:
Process:
Upload Build
↓
Fill Metadata
↓
Submit Review
↓
Apple Review
↓
Publish
Apple Review Checks
Apple checks:
✅ App functionality
✅ Privacy compliance
✅ Security
✅ Payments
✅ Content guidelines
Common App Store Rejection Reasons
❌ Crashes during review
❌ Missing privacy policy
❌ Misleading screenshots
❌ Poor user experience
❌ Using private APIs
🤖 Launching on Google Play Store
For Android:
Create:
Developer account:
$25 one-time fee
Steps:
Generate APK/AAB
↓
Upload
↓
Complete Store Listing
↓
Testing
↓
Production Release
📈 Phase 10: After Launch
Launching is not the end.
It is the beginning.
Monitor:
User Analytics
Track:
- Downloads
- Active users
- Retention
- Conversion
Tools:
- Firebase Analytics
- Google Analytics
- Mixpanel
Improve Using Feedback
Users tell you:
- What works
- What fails
- What they need
Growth Strategy 🚀
1. App Store Optimization (ASO)
Improve:
- Title
- Keywords
- Screenshots
- Reviews
2. Marketing
Channels:
- Content marketing
- Social media
- SEO
- Communities
- Influencers
The Complete Application Development Roadmap 🗺️
Idea
↓
Market Research
↓
PRD
↓
UI/UX Design
↓
Technology Selection
↓
Development
↓
Testing
↓
Security Review
↓
Deployment
↓
App Store Submission
↓
Marketing
↓
Continuous Improvement
🔥 Golden Principles for First-Time Developers
1. Launch Early
A small working app beats a perfect unfinished app.
2. Solve One Problem Extremely Well
Don’t build everything.
Build something valuable.
3. Users Are Your Best Teachers
Analytics and feedback are better than assumptions.
4. Performance Matters
Users leave slow applications.
Optimize:
- Database queries
- Images
- APIs
- Memory usage
5. Build For Scale
Even if you have 100 users today, think about 1 million tomorrow.
Final Thought 🌟
“The first version of your application is not your masterpiece. It is your first conversation with users.”
Your goal is not just to write code.
Your goal is to create something people love using.
The journey:
Idea → Code → Product → Users → Impact 🚀📱
Start building. Keep learning. Keep improving. 🌱


Comments
Post a Comment